Showing posts with label Sweet. Show all posts

Thursday, December 10, 2015

Seasonal chestnut pancakes


I am a total pancake fanatic. If I could I would have them every morning. This version is gluten free, using chestnut flour which considering the season I thought pretty appropriate. I also add a little lupin flour as it contains lots of plant protein.

Lupin is a totally cool vegetable protein source. Very underrated even though it is nutritionally a hard hitter. It's a great source of vegetable fiber, aiding in digestion, lowering cholesterol levels and supports general intestinal detoxification. Contains substantial levels of vitamin B's; thiamin, which is essential for converting carbs into energy and for brain cell membranes, and folate, used for proper DNA replication. Zinc, for immune function and magnesium which helps muscles recover after a work out as well as supporting bone strength. However it should be noted that allergic reactions have been had by those with peanut allergies.

The ground flaxseeds I use in these pancakes are also a great source of dietary fiber. Grinding them makes their fiber absorbable as it is not while they are kept whole.
It's always best to grind your own flax seeds, as they go rancid very quickly making them harmful rather than beneficial nutritionally. To grand them flat seeds simply whizz them with any type of food processor.


Ingredients for 4 pancakes:
2 dl chestnut flour
1/2 dl lupin flour
1/2 dl ground flax seeds 
pinch of salt
2 eggs
2-2,5 dl plant/rice milk
1,5 tbsp ghee or coconut oil


  1. Begin by mixing the eggs then adding half the milk, mix. 
  2. Mix the dry ingredients and then add 1/3 to the egg milk mix, whisk till it's lump free. 
  3. Now add the remaining flour and the melted fat of choice. 
  4. Heat a medium to large sized frying pan, add a little fat and using a tissue spread the fat out evenly in the pan. 
  5. Once the pan is sizzling hot, drop 1dl of the pancake mix into the middle of the pan and then slowly roll the pan so that the batter spreads a little towards the pans edges. Turn down the heat. You want a round-ish shaped pancake. The first pancake always needs a little extra time in the pan. Flip it over once you see that the top has congealed (no longer runny)and the edges are cooked  (hard but not burned). Flip the pancake and cook for a few seconds. 
  6. Repeat this process with the rest of the batter, only the rest of the pancakes should need less cooking time than the first. 
I love to serve my pancakes with a chia berry compote. The chia seeds are great at soaking up liquids so my defrosted (frozen) berries get turned into a thick sauce instead of a wet mess. Chia seeds are a brilliant way of getting you those much needs Omega-3 fats.

Slices of banana or pear are also a great topping, as well as hempseed for more plant protein. A sprinkle of cinnamon adds to the seasonal flavour, as well as helps stablize blood sugar. 

Soaked prunes, dates or maple syrup are my usual choice of sweetners. 


Thursday, September 24, 2015

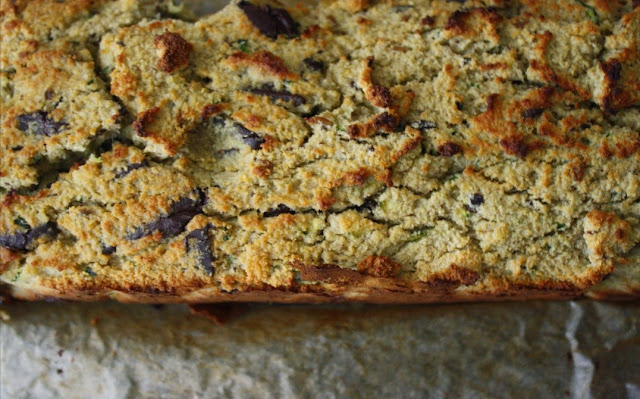
Moist, chocolate speckled zucchini bread - Gluten free


I love coconut flour. Wow what a revelation. It gives a certain fluffier texture to baked goods while staying light and moist. Perfect for this recipe.

I sweetened with dates, no additional sugar used. The chocolate also helps add sweetness but I believe the coconut flour also gives a little sweetness of its own.

Truly addictive, and I only say this after sharing some of the bread with friends and they praise was high enough for me to feel free to.

Coconut flour is made from coconut meat. It's gluten free and high in fiber, which we all know in turn is good for our digestion, helping move unwanted cholesterol and other bad fats out of our system which in turn protects us from clogged blood vessels and other cardiovascular diseases. Fiber has also been found to help combat colon cancer, again as the fiber helps speed up the expelling of toxic wastes from our metabolism.  

Ingredients needed for one loaf: 

100-150 grams dark chocolate, roughly chopped 
4 eggs 
2 tbsp coconut oil, melted
4-5 dates (soak for at least 30min)
1 dl yoghurt (sheep, coconut or cows)
1,5 dl oat, rice or other nut milk
2 dl coconut flour
1 dl oat flour (gluten free)
1/2 medium sized zucchini, grated
choose between 1/2 grated apple or 1 mashed over ripe banana
2 tsp baking powder 
pinch of salt 
1/2 tsp grated nutmeg
1/2 tsp cinnamon 
optional - 1 dl walnuts, pecans or pumpkin seeds (I used pumpkin)


  1. Pre-heat your oven to 180C. 
  2. Cook the dates in the water, to loosen them up and then puree into a sauce
  3. Whisk the eggs till fluffy, add the date puree once cooled
  4. Same goes for the coconut oil, heat so it melts, then add to eggs once slightly cooled
  5. Now add the milk, zucchini and apple/banana
  6. Add all the dry ingredients, mix. 
  7. Add the chocolate, mix. 
  8. If the dough is looking dry (it needs to be some what loose, sticky), add a little more milk
  9. Transfer the dough to a baking tine lined with baking paper or grease the pan before hand
  10. Bake for 45min-1hour. You will know its ready when you can poke a form in the middle and it comes out dry. If while baking the top of the bread starts to look a bit too dark, cover with some aluminium foil. 
Allow the bread to cool and then dig in and enjoy!!


Friday, September 4, 2015

A little green treat


I need afternoon snacks, and sweet ones are always preferable. This little green treat is an adjusted version of The Green Kitchen Stories magic mousse. The variation came about as I didn't have raw cacao powder and because I was craving something green. It's just about the simplest and quickest treat to make and it will fulfil that creamy, sweet, craving you might have late afternoon. 


Here is what you need, serves one: 
1 ripe banana
1/2 ripe avocado
1/2 tbsp raw cacao nibs
pinch of himalayan sea salt
1 tbsp nut butter of your taste* ( I used a mixed version containing, almond, cashew and hazelnut)
1 tsp - spirulina/ chlorella or other green super food powder

* keep in mind that the nut butter will influence the texture and taste. Tahini is always a winner in my opinion but it will turn this treat towards a more savoury flavour.

Place all the ingredients in a blender, mix, taste adding more nut butter or cacao to taste.

Now sit back and enjoy the healthy treat you made!


Monday, August 24, 2015

Coconut flour pancakes


I am well aware that I have posted multiple pancake recipes at this point. Perhaps you're catching onto my love of these dense, yet fluffy, sweet and inner child pleasing pillows of heaven.

I recently discovered coconut flour so I decided to give it a go on my favourite breakfast item. I can tell you it was a success! The coconut flour has a certain graininess or perhaps better explained as a rougher texture than regular flour. However it brings lots of moisture and fluffiness in place of the denseness other flours can give. The great thing is it's gluten free and full of good nutrients (to read more on nutrients see my post on zucchini bread).

Ingredients for 4 pancakes:

2 eggs
2 dl coconut flour
1,5 dl oat flour
pinch of salt
1,5 tsp baking powder
2,5-3 dl oat/nut/soy/dairy milk
1 tbsp coconut oil, melted

optional - 1/2 tsp cinnamon or cardamon or zest of lemon or lime (perhaps even orange could be nice)


  1. Begin with mixing the milk and eggs till combined
  2. Mix the dry ingredients in a separate bowl and add to the milk egg mix. 
  3. Heat pan and melt the coconut oil, add to the batter. Keep the pan and the left over coconut oil and when you know the pan is hot, but not searing hot, using a soup ladle or dl cup scoop out enough for each pancake into the pan. Make sure there is room for the pancake to ooze a little to each side. Turn down the heat. Allow to cook on the first side for approx. 2-3 minutes, then flip and allow for the same time on the other side. If you touch the middle of the pancake it should feel bouncy, if not allow to cook further on a low heat. 
Serve the pancakes with your choice of berries and or fruits, maple syrup or honey, nuts or seeds. My favourite always remains slices of banana, blueberries and or raspberries and toasted walnuts topped with a good splash of maple syrup. 


Sunday, February 15, 2015

Sweet, Swedish cinnamon & cardamon buns


When I go home to Sweden this is one of the first things I seek out, and it has to be from one of three reputable bakeries as my 'kanel bulle', literally transited to cinnamon bun, has to be perfectly baked. Crisp on the outside, soft and full of spice in the middle. Preferably butter and sugar has not been held back as this combo will give the bun a slightly caramelised crust on the bottom. Here is one item where I leave healthiness, as in refined sugar and flour, at the road side. 

However, as always I cannot leave the notion of making a healthier version alone, so I have experimented with the recipe for years and so far I have managed to cut back on a little of the sugar and used a bit of wholemeal spelt (although I can recommend not sing any wholemeal as it just adds dryness). So far I have not successfully been able to bring down butter content. 

Here is what you need for the dough: 

600 grams unbleached spelt flour 
150 grams wholemeal spelt
50 grams fresh or dried yeast
5 dl milk of choice (I used rice)
2 cardamon pods - peeled and crushed* 
pinch of salt 
125 gram butter 
1 dl honey, maple syrup or other form of sugar/syrup

Here is what you need for the spice filling: 
150-200 grams butter (amount depending on how brave you dare be with the butter content)
2 tbsp ground cinnamon 
2 tbsp crushed cardamon seeds
1 tsp nutmeg
1,5 dl sugar - preferably coconut, palm or muscovado sugar (or use half/ half maple or honey with sugar)
pinch of salt

optional - an egg used to glaze the buns 

*using fresh cardamon seeds gives so much more flavour and aroma. Peels the shell off the pod of the cardamon, and then grind with a mortar and pestle or using a kitchen towel crush them using something heavy (on a durable surface). 


  1. Melt the butter in a pan, take off the heat and add the the milk. You want this mixture to be 37C, which basically is the same temperature as your body, so if you stick your finger in the mix you should feel nothing (not hot nor cold).
  2. Add the butter milk mix to a bowl with the yeast. Slowly stir so that the yeast melts into the liquid. 
  3. Add the cardamon and salt, mix. Then slowly add the flour, at first stirring with a wooden spoon to avoid clumps. Once you have more of a solid dough, use your hands to turn it into a shiny, elastic dough. Sprinkle a little flour over the top, and cover with a clean kitchen towel. Set aside for 30-40 minutes. The dough should have almost doubled in size. 
  4. While the dough proofs, using a blender mix the ingredients for the filling. 
  5. Sprinkle flour on a work surface and carefully take out the dough from the bowl and work it into a less sticky, more solid dough. Adding a little flour at a time. 
  6. Halve the dough and then roll out one of the dough pieces, you want a sort of large pizza (rather oval than round) approximately 1,5 cm thick. 
  7. Now spread the dough with half the filling mix. Then starting at one end of the dough start rolling the dough from one end to the other. You should end up with a long rolled up log. 
  8. Cut slices, approximately 3cm wide, horizontally across the log. This should leave you with swirls or snail like shaped buns. you can also make a sort of braid through the log, but this requires a drawn directions. Basically you almost slick through the log as if you were making separate buns, and then you kind of braid these half slices over each other. I won't be offended if this makes no sense. Best to look online how to make this braid. 
  9. Place baking paper on a tray and place the slices (leaving enough space between each piece for them to grow. Allow them to proof for 15-20 minutes. 
  10. Meanwhile preheat your oven to 180C.
  11. Bake the buns in the oven between 15-25minutes. Allow to cool and enjoy with a good cup of tea or coffee. 


Saturday, January 10, 2015

Winter comfort - Caramel, sea salt, raw cacao, quinoa cookies


Rain, wind, storm, is the prefect backdrop to baking. We have a beautiful french bakery in Amsterdam that bakes among other things, salted chocolate cookies. Crisp, salty, chocolatey. So I tired to make something similar, without knowing their recipe. I was also lucky enough to have a pot of salted caramel in the fridge that I swiftly took advantage of having.

As per usual I had to add a bit of healthy to the mix, so I decided to use some quinoa flour. You do not have to use any, you can instead up the amount of oat or spelt flour. I just cannot seem to bake without adding or subtracting something to balance out the unhealthy. You could replace the oat with whole wheat spelt flour.

I used raw cacao as it contains lots of good for you B vitamins and minerals (bone contributing phosphorus, iron and muscle relaxing magnesium) and a packs a high dosage of antioxidants. It also is very high in caffeine. There is a big difference between cocoa and cacao, the later being unprocessed and therefore retains many of the benefits of chocolate.


Here are the ingredients:

100 grams butter at room temperature
1,5 dl palm, coconut or muscovado sugar (even unbleached white sugar will do)
2 tbsp raw cacao powder
2 tbsp caramel sauce (you could replace this with another 3/4 sugar)
1 dl quinoa flour
1 dl oat flour
1 3/4 dl unbleached spelt flour (not whole wheat).
1 tsp baking powder
3 large pinches of sea salt + another pinch for after baking
1 egg

  1. Preheat your oven to 180C. 
  2. Mix the butter, sugar and cacao into a paste. Add the egg, continue mixing. 
  3. Add the caramel sauce. 
  4. Slowly add the flour and baking flour. 
  5. Now add the sea salt. 
  6. Cover an oven rack with baking paper. 
  7. Using two spoons, scoop up a spoonful of the dough and using the other spoon slide it off onto the oven rack. Continue till you have used up all the dough. Then using the backside of a spoon flatten each ball of dough. 
  8. Place in the middle of the oven, bake for 8-10minutes. One out of the oven sprinkle each cookie with a pinch of sea salt. 


Thursday, July 10, 2014

Serious chocolate chip cookies


I have posted chocolate chip cookies recipes before, and they have also been delicious but all so far have been consciously using more nutritionally rich ingredients. This version is less so. The inspiration? My local coffee spot serves the most delicious chocolate chip cookies. Nothing healthy about them and probably also nothing bio in them. But wow, they are good. So I tried to replicate them, several times actually, each time trying to let go of my wanting to make them healthier. Finally I came to this version, still not as far gone as the originals but close enough.

Here we go, serious chocolate chip cookie ingredients list - makes a batch of approximately 20 cookies: 

4 dl unbleached white spelt flour 
250 grams good quality chocolate
1 tsp salt (don't skip on this as it plays an essential role)
1 dl rosted pecan or walnuts 
100 grams butter (or coconut oil) - softened
1 tsp baking powder

  1. Pre heat your oven to 180C. 
  2. Place all the dry ingredients in a bowl and mix. The add the softened butter, mix. 
  3. Now add the chocolate. 
  4. Scoop out cookie portions and place on a baking tray.
  5. Bake for approx. 8-13min. Keep an eye on them while in the oven as you want them coming out pale, almost under baked. That allows the soft consistency that adds so much to the experience of these delicious little bundles of serious chocolatey-ness. 


Monday, April 7, 2014

Red Beet, Courgette Cake


This cake is a perfect afternoon pick me up cake. You can replace the red beet for carrot and the courgette for banana.

Ingredients:
1 medium sized red beet
1/3 courgette
1 small apple
2 dl sugar (I used palm sugar)
pinch of salt
1 dl oat flour
2 tbsp baking powder
2 dl white unbleached spelt flour
1 dl flaxseed flour (blend flax seeds in a blender till you have a sort of flour)
3 eggs
80 grams coconut oil
1 dl sunflower seeds

  1. Pre-heat your oven to 180 C
  2. Use a blender to mix the eggs and the sugar, till fluffy
  3. Peel the red beet. Grate the red beet, courgette and apple
  4. Melt the coconut oil on a low heat
  5. Mix the dry ingredients in a bowl
  6. Slowly add the dry ingredients to the egg mix
  7. Then add the cool coconut oil
  8. Now add the grated vegetables and blend
  9. Grease a cake pan and dust with flour
  10. Pour the cake batter into the form and sprinkle the sunflower seeds over the top
  11. Bake in the middle of your oven for 45min - 1 hour, depending on your oven. test by sticking a fork or knife into the middle of the cake, it should come out dry and not covered in dough. 


Monday, March 17, 2014

Banana flaxseed bread


I am a sucker for good banana bread. I keep making new versions playing with the ingredients to find new textures and consistencies. This version is more of a bread than cake as it's firmer, dryer and less sweet than a cake. Its best served toasted and buttered and if you want to be 'crazy' spread on some nut butter of your choice with some honey over the top.


For this recipe you will need:

3 small or 2 large over ripe bananas (almost black would be best)
2dl spelt flour (I used half whole wheat spelt and half white unbleached)
1 dl buckwheat or oat flour
3 eggs (room temp)
1 grated apple
0,5 dl maple syrup or honey
1 dl sugar (I used palm sugar)
70 grams melted butter or coconut oil
1,5 dl flax seeds
2,5 tsp baking powder
pinch of salt
1 dl roasted walnuts
optional - 0,5 dl coconut flakes

You could also add sunflower or pine nuts instead of the walnuts, or pecans. Some poppy seeds are also always nice to add, just 2 tbsp or so.

  1. Pre heat your oven to 180 C. 
  2. Mix the eggs with the sugar, honey/syrup, you want a fluffy consistency and a white-ish colour.
  3. Mix the dry ingredients in a bowl. 
  4. Mash the bananas.
  5. On a low heat melt the butter or coconut oil. 
  6. Now bit by bit add the dry ingredients to the egg mix, blend slowly. 
  7. Add the cooled butter/oil, blend slowly.
  8. Now add the banana and walnuts, again blend slowly. 
  9. Butter or grease a cake/bread pan and dust with flour. 
  10. Pour the batter into the cake pan and place in the middle of your oven. Bake for between 45min-1hour, depending on the heat of your oven. test by sticking a fortk or knife into the middle of the cake, the fork/knife should come out dry and not coated by dough.
As I mentioned above this bread does best if toasted and eaten with butter or nut butter and a little honey. 


Tuesday, March 11, 2014

Swedish cinnamon & cardamon buns


I could write a whole page about how these buns transport me back to Sweden, how every time I go back it's the first thing I seek out to eat. Suffice to say they bring me a feeling of home. Besides this they are just delicious. Of course I made mine with whole wheat flour and palm sugar, lowering the butter and sugar which honestly did them no favour so I will instead increase the amounts in the recipe below so that you will get the right 'kanel bulle' as they are called in Sweden.

Ingredients:

150 grams butter
5 dl milk (soy, goat, almond or cows)
75 gram yeast
1,5 dl sugar
1 tsp salt
3 tbsp crushed cardamon
17-18 dl flour (I used 50% whole wheat spelt & 50% unbleached white spelt however I recommend lowering it to a ration of  20% & 80% to avoid dry buns)
* optional topping - almond flakes

filling:
100 grams butter at room temp
1/2 dl sugar
3 tsp ground cinnamon
1 tsp ground cardamon

optional:
- 1/2 tsp ground nutmeg
- 1 tsp vanilla sugar


This recipe does require patience & time as it take almost 3 hours to make with the proofing and baking time included.

  1. Melt the butter in a pan on a low heat, then add the milk of your choice. This hold bring the liquid to a body temp (37C - test by dipping your finger in the liquid and if you feel no actual warm or col then its at body temp, otherwise leave to cool or heat slightly)
  2. Transfer the liquid to a large mixing bowl. Crumble the fresh jest or pour the dried yeast into the butter milk mix and blend till the jest has melted into the liquid. 
  3. Add the sugar, salt and crushed cardamon to the liquid. Then add 80% the flour slowly, mixing to combine all. Once all has combined and your left with the silky dough add another 10% of the flour, you want to the dough to shiny and elastic with a slight stickiness but not overly wet consistency. The dough should remain in its bowl during this part of baking. 
  4. Cover with a clean linen cloth or plastic foil and place the bowl in a warmish area of the kitchen this will help the proofing of the dough. You want the yeast to start expanding, important is that it is not placed in a cold marble surface nor on a hot stove top. 
  5. Allow to proof for 40min. The dough should double in size. 
  6. Meanwhile mix the filling ingredients to a smooth paste. 
  7. Take out the dough from the bowl and place on a floured surface, and work it with your hands till shiny and elastic. You may need to add flour to keep it from sticking. 
  8. Half the dough into two equal halves. place one half to the side. Then using a rolling pin roll out the dough to a flat pancake. 
  9. using a spatula spread the half the filling paste onto the flattened dough. Now roll the dough from one end to the other you you end up with a long snake of rolled dough. Use a knife to cut the dough into buns. Place these buns a baking tray with baking paper and allow to proof for another 40min. 
  10. Do the same for the second half of the dough. If you want you can sprinkle extra sugar or almond flakes over the top of the buns.
  11. Pre heat your oven to 250 degrees C, 20min through the proofing time. Place the buns in the middle of the oven for 5-8 min and then lower the heat to 225 C for another 14-18min. 
  12. Allow the buns to cool. 


Thursday, January 23, 2014

Peach and Prune, Almond Pie


I love fruit pies, this pie you could change out for other seasonal fruits for other times of the year. You could even thaw frozen berries and add them, only I would first toss them in some starch flour (potato or other similar binding flour) to soak up access moisture form the berries.

The pastry is made of almond, oats, spelt (dinkel) flour, butter and a tbsp of sugar.


Fruit:
500 grams fruit of your choice
+/- 1 dl sugar (I used palm sugar) - depending on the fruit you use you might need more or less sugar.
1 dl almond slivers

Pie dough:
1,5 dl spelt (dinkel) flour
1/2 dl oats
1 tbsp sugar
70 grams butter
1 dl almond flour (ground almonds)
1 dl almond flakes

  1. Wash the fruit and slice into bite size pieces. Mix in a bowl with the sugar and allow to marinate while you prepare the dough. 
  2. Place all the dry ingredients in a bowl and then add the butter. Nip and crumble the butter into the dough. Crumble and mix till all the butter has been absorbed and you are left with a dough. 
  3. Allow the dough to rest in the fridge for at least 15min. 
  4. Pre heat your oven to 180C. 
  5. Roll out the dough between two baking papers then carefully place the thin dough into a pie form. 
  6. Add the fruit to the pie and then top with the almond slivers (which will toast in the oven and come out crisp and golden).
  7. Bake the pie for approx. 35-50min. Depending on the fruit you use, berries have a shorter baking time while apples and pears need longer.
Serve the pie with whipped cream, vanilla ice cream or vanilla custard. 


Wednesday, April 10, 2013

Buckwheat, oat, hempseed - chocolate chip cookies


When you are feeling a little blue or you simply just want some crispy and chewy cookies these are the ones to make.

As always it's a recipe I made up along the way and luckily it turned out in my favor. The nice thing is you can exchange the tahini for peanut butter, the chocolate for cacao nibs, the hemp seeds for walnuts or hazelnuts. Really its what your in the mood for on that particular day you decide to bake these. Also you can feel good about the fact that your using oats and buckwheat flour as they have higher nutritional value as regular plain wheat flour.


Ingredients list - 8-10 cookies

1,5 dl oats
1,5 dl buckwheat flour
1 tbsp tahini
1/2 dl hemp seeds or finely chopped hazel or walnuts
60 grams dark chocolate or purely cacao nibs
1 dl palm sugar or agave or unbleached cane sugar*
1 dl coconut oil
pinch of salt
1 tsp baking powder
1 egg

* I prefer to use palm sugar for it's nutritional value and because it had a lovely caramel-ish flavor and smell.


  1. Pre heat your oven to 180 degrees C. 
  2. In a mixing bowl add the egg and sugar and coconut oil till your left with a smooth paste. 
  3. Mix all the dry ingredients minus the nuts and chocolate, and to the paste. 
  4. Add the tahini and the nuts. 
  5. Chop the chocolate into the size you prefer - I like both small and large chunks so I chop it roughly. 
  6. Add the chocolate. 
  7. Place some baking paper on a oven tray and then using 2 spoons scoop out the cookie down and place on the baking tray. Make sure you leave space between each scoop as they will melt own into puddles. 
  8. Bake in in the middle of the oven for about 10-13min. 

Sunday, March 24, 2013

Chocolate hazelnut cake


This cake has become a bit of an obsession. Not only because it contains chocolate but because I have been working in hight & consistency for a long time. I am now finally happy having finally found the right amounts and measurements.


Here are those measurements:

4 eggs
200 grams 70% chocolate
150 grams butter*
400 grams of hazelnut flour (blend preferably roasted & shelled hazelnuts in a blender. blend till you end up with a flour)
pinch of salt
2-3 tbsp sugar**
optional - 1 dl walnuts


*You could replace this with coconut oil - but then use between 80-100 grams. I have not tried it myself but it's worththe try if you dont want to use butter. Although I cannot promise the same final result as with butter.
**I use palm sugar because it contains more nutrients than regular cane. 


  1. Pre-heat your oven to 180 degrees Celsius. 
  2. Melt the sugar & chocolate over a bain-marie (place a metal bowl over a pan filled with water. The water should not touch the bowl, you dont need a lot of water)
  3. Whisk the eggs and sugar till fluffy
  4. Add the somewhat cooled off butter & chocolate
  5. Add the hazelnut flour, mix. 
  6. Finally add the walnuts
  7. Grease a cake form and then pour the cake mix into it
  8. Place in the middle of the oven for 35-40 min. The cake should be solid around the edges and still soft in the middle. 
  9. Allow the cake to cool and sit for at least 1 hour. If it's cold outside then put it out. Preferably you have the patience, once it's cooled enough to place it in the fridge then let it sit over night. That will only improve it's taste. I myself never have that patience. Luckily it's a bit cake and it's very rich so you will have plenty over to both place in the fridge & have a slice out of the over. 


Monday, October 29, 2012

Sticky, crispy chocolate chip cookies

Soft and gooey on the inside, slightly crunch on the outside, need I say more?

Let's just say I finally made the type of cookies I have dreamed of making, they hit the spot when you have a chocolate chip cookie craving.

Friday, September 21, 2012

Fluffy pancakes made from quinoa, oat, almond flour

This rates as angel food to me. With the added value of being healthy & gluten free! This is a recipe I have taken from one of my favorite food blogs, Sprouted Kitchen. I made my own adjustments but basicallty she is the one to credit if you make these.


Sunday, September 2, 2012

Best carrot cake so far

What a triumph! Finally, I made a carrot cake that I have nothing but positive remarks about. It's moist but not oily, the nut quantity is perfect, the spices not over powering and the sweetness balanced.  Usually I always find something that could have been improved, removed or added.

My hypothesis is that its because I used a mix of almond & regular flour as well as grinding the cardamon seeds into powder making them more vibrant and fresh in flavor that pre-ground. Perhaps it also had to do with using dark syrup instead of sugar. I am sure Agave would be a perfect fit as well, however I do believe the syrup make it slightly more dark and rich. I might also be tempted to use whole wheat flour next time around.

Friday, August 24, 2012

Midnight milkshake (using raw foods)

The perfect midnight indulgence, sweet, creamy, smooth, chocolate flavored. And the best part is that its Healthy!


This is a top notch example of adapting the old fashioned recipes to a healthier version and while preserving its original yummieness. Here is my version of Sarah Britton's of mynewroots.blogspot.com Raw chocolate milkshake miracle, find here recipe here:
http://mynewroots.blogspot.nl/2010/06/raw-chocolate-milkshake-miracle.html

You can also read all about the health benefits of cacao (not cocoa!) on the same page. One day I hope to be as knowledgeable as Mrs. Britton.

Here is my adaption, serves 1:
1/2 banana (added value if it's frozen)
1 tbsp raw cacao nibs
1 dl soy milk 
20 grams high quality dark chocolate
1 tbsp maple or agave syrup, honey might also work 
1/4 avocado 
1 tsp mixed raw nuts (I used cashews, almond and brazil nut)
1 tsp roasted hazelnuts (adds a certain nutella flavor)
1 tsp hemp seeds 
1-2 ice cubes 


Place all in a blender and blend till smooth. You should end up with a thick chocolatey milkshake. 

Mix it up, You could add or replace the following:
Blueberries
Raspberries
Strawberries 
Mint
Nuts could be replaced by pastes, just make sure your using unsweetened versions, so that your not back tracking on the health 
aspect of this milkshake. 


Tuesday, August 21, 2012

Almond flour brownies (gluten free!)

This is angel food. Soul healing. with the added benefit of being gluten free, so in my mind healthier than white flour. As we all know my experiments with whole wheat, less sugar and butter, brownie attempts have been fruitless in achieving that scrumptious, finger licking, sticky, fudgey, chocolaty goodess that white flour, massive butter and sugar result in.

I have tried this almond flour brownie a few times and now I am finally content with the end result. The health benefit of chocolate/cacao not to be confused with cocoa can be read here. The higher cacao percentage in your chocolate the better for you.